Bringing a new gas dryer into your home can significantly streamline your laundry routine, offering efficient and often more cost-effective drying. But before you enjoy the fresh scent of perfectly dried clothes, a crucial step awaits: installation. Unlike electric dryers, gas models require careful attention to gas line and ventilation connections, where safety is paramount. This guide is designed to walk you through every critical step, ensuring your gas dryer is installed securely and operates safely, protecting both your home and your family.
Understanding the Importance of Safe Gas Dryer Installation
Installing a gas dryer isn’t just about plugging it in and connecting a hose; it involves working with natural gas or propane, which carries inherent risks if not handled correctly. Improper installation can lead to dangerous gas leaks, a buildup of carbon monoxide, or even fire hazards due to obstructed vents. A safe installation guarantees your dryer functions optimally, extends its lifespan, and provides peace of mind. It’s a job that demands precision and adherence to safety protocols.
Your Essential Pre-Installation Checklist
Before you begin, preparation is key. Gathering the right tools and confirming your space is ready will make the installation process smoother and safer.
Tools and Materials You’ll Need:
- Adjustable wrenches (two recommended for tightening)
- Pipe joint compound (pipe dope) or PTFE (Teflon) tape for gas connections
- New flexible gas line connector (CSA International approved)
- Rigid metal ducting or semi-rigid metal ducting for the vent (4-inch diameter)
- Duct clamps
- Screwdriver
- Level
- Leak detection solution (soapy water)
- Carbon monoxide detector
- Flashlight
- Your dryer’s owner’s manual
Site Preparation:
- Locate the Gas Shut-Off Valve: Identify the main gas shut-off valve near your dryer’s intended location. It’s crucial to know where this is and how to turn it off.
- Ensure a Gas Supply Line: Confirm that a dedicated gas supply line with a shut-off valve is present in the laundry area, ideally within 6 feet of the dryer. If not, a qualified technician must install one.
- Check Electrical Requirements: Gas dryers typically require a 120-volt, 3-prong grounded electrical outlet. Ensure you have the correct outlet type and it’s properly grounded.
- Verify Venting Access: You’ll need an exterior vent opening. Gas dryers must be vented outdoors to prevent the accumulation of exhaust gases and moisture.
- Clear the Area: Make sure there’s enough space around the dryer for installation and future maintenance, typically several inches from the wall to prevent crushing the vent hose.
Step-by-Step Guide to Gas Dryer Installation
Let’s walk through the installation process, focusing on critical safety aspects.
1. Unpacking and Positioning the Dryer
|
Our Picks for the Best Clothes dryer in 2026
As an Amazon Associate I earn from qualifying purchases.
|
||
| Num | Product | Action |
|---|---|---|
| 1 | BLACK+DECKER BCED37 Compact Dryer for Standard Wall Outlet, Small, 4 Modes, Load Volume 13.2 lbs., White |

|
| 2 | Euhomy Dryer, 3.5 Cu. Ft. 1500W Clothes Dryer, Stainless Steel Tumble Dryer with Exhaust Hose for Home, Apartment, Dorm, White |
|
| 3 | MOJOCO Portable Clothes Dryer - Mini/Compact Dryer for Apartment, RV, Travel - Small Quiet Fast-Drying Machine with Adjustable Timer & Hassle-Free Setup |
|
| 4 | Kenmore 7.0 cu. ft. Front Load Electric Dryer - with Guard to Reduce Wrinkles & Static - Smart Sensor Drying - LED - White |
|
| 5 | HOMIDEC Clothes Drying Rack, Oversized 4-Tier(67.7" High) Foldable Stainless Steel Drying Rack Clothing, Movable Drying Rack with 4 castors, 24 Drying Poles and 14 Hooks for Bed Linen, Clothing, Grey |
|
| 6 | Sakugi Clothes Drying Rack, Foldable 2-Level Laundry Drying Rack with Height-Adjustable Wings, for Clothing & Bedding, Free-Standing Space-Saving Rack, Indoor & Outdoor, 55.5" L × 22.8" W, Gray |
|
| 7 | GE PROFILE 7.2 cu. ft. Vented Electric Dryer in White with Auto Dry and Extended Tumble |
|
| 8 | Portable Clothes Dryer, 900W Fast Drying & Large Load Capacity for Laundry and Shoes - Compact Mini Dryer Machine for Travel, Apartments, RV, Dorm Blue |
|
| 9 | Drying Rack Clothing, 3-Tier Clothes Drying Rack Foldable, Antirust Laundry Drying Rack Collapsible Use for Indoor & Outdoor, 11.8" D x 34.6" W x 35.4" H, White |
|
| 10 | Amazon Basics Foldable Portable Clothes Drying Rack for Indoor Air Drying, Collapsible Design, 14.5" D x 29.5" W x 41.8" H, White |
|
Carefully remove your dryer from its packaging. You may need assistance tilting the dryer to screw in the leveling feet. Once the feet are installed, stand the dryer upright and move it close to its final location, leaving enough room to work behind it. Use a level to ensure the dryer is perfectly balanced from side to side and front to back. Adjust the leveling feet as needed.
2. Making the Gas Line Connection – The Most Critical Step
This is where attention to detail is paramount to prevent gas leaks.
- Turn Off Gas Supply: Locate the gas shut-off valve and turn it to the “off” position.
- Apply Thread Sealant: Apply pipe joint compound or wrap PTFE tape clockwise around the male threads of the gas supply pipe and the dryer’s gas inlet. This ensures an airtight seal.
- Attach Flexible Gas Line: Connect the new flexible gas line connector to the dryer’s gas inlet, then connect the other end to the gas supply valve on the wall.
- Tighten Connections: Using two adjustable wrenches, carefully tighten all connections. Use one wrench to hold the dryer’s gas inlet or wall pipe steady, and the other to tighten the connector. Do not overtighten, as this can strip threads and cause leaks.
- Test for Gas Leaks: This step is non-negotiable. Turn the main gas supply back on. Mix dish soap with water to create a soapy solution. Apply this solution to all gas connections you just made. If you see any bubbles forming, you have a gas leak. Immediately turn off the gas supply, tighten the connection, and retest. Repeat until no bubbles appear. If leaks persist, turn off the gas and call a qualified professional immediately.
“Never skip the leak test. A gas leak can be odorless and incredibly dangerous, leading to explosions or carbon monoxide poisoning.” – John D. Expert, Certified Appliance Technician
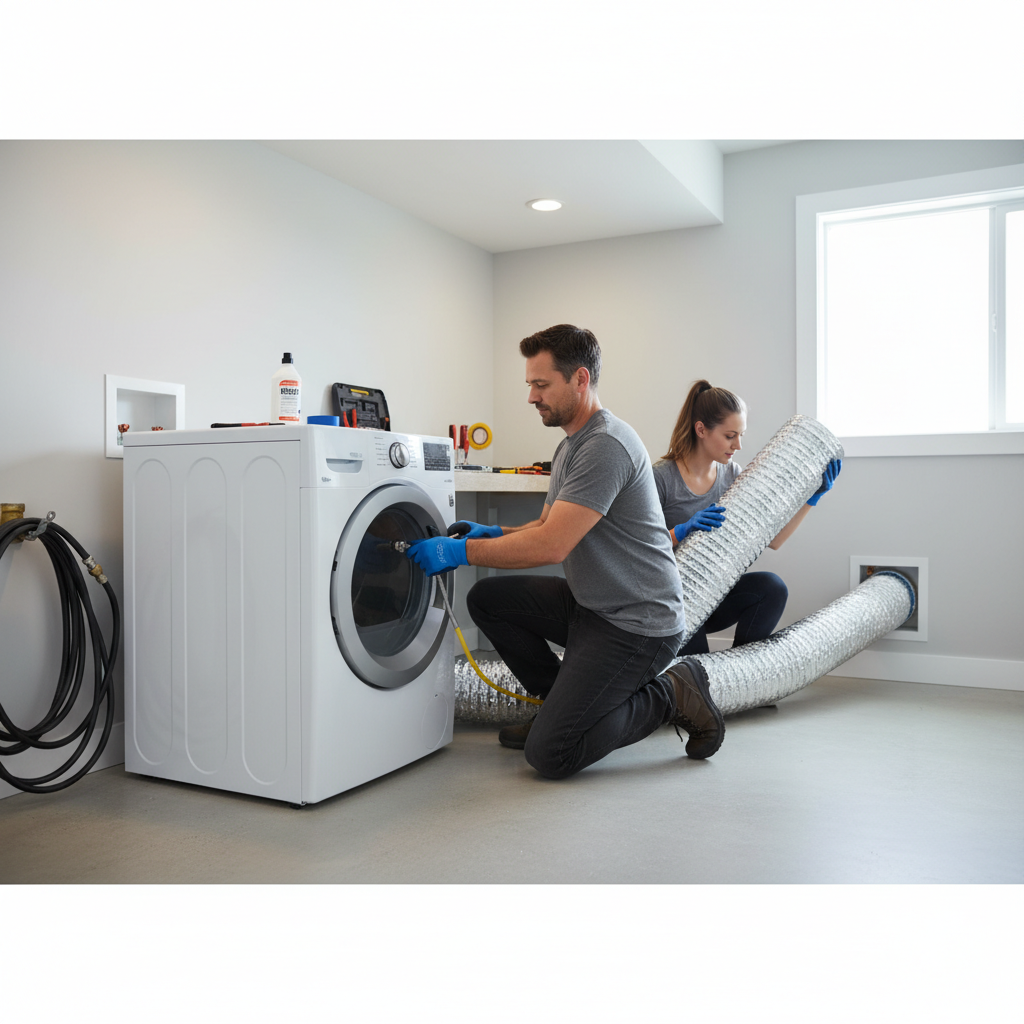
3. Connecting the Vent System for Proper Exhaust
Proper venting is crucial for efficient drying and preventing fire hazards and carbon monoxide buildup.
- Use Approved Materials: Always use rigid metal or semi-rigid metal ducting for your dryer vent. Avoid plastic or flexible foil ducts, which are prone to lint buildup, crushing, and are less fire-resistant.
- Minimize Length and Bends: Keep the vent path as short and straight as possible. Excessive length and too many bends reduce airflow, increasing drying time and fire risk. Each 90-degree bend is equivalent to adding 5 feet of duct length. The total vent run, including bends, should generally not exceed 25 feet, but always check your dryer’s manual for specific recommendations.
- Secure Connections: Slide one end of the duct over the dryer’s exhaust outlet and secure it tightly with a duct clamp. Connect the other end to the exterior vent hood, ensuring a tight, airtight seal.
- Vent Outdoors: Confirm the vent terminates outdoors and has a code-compliant cover to prevent pests and backdrafts.
- Check for Crushes/Kinks: Ensure the vent hose is not crushed or kinked behind the dryer when you push it into place. This is a common issue that restricts airflow.
4. Completing the Electrical Connection
Gas dryers still require an electrical connection for the drum, controls, and igniter.
- Install Power Cord (if not pre-installed): Refer to your dryer’s specific manual for instructions on installing the power cord. This typically involves connecting the appropriate wires to the terminal block at the back of the dryer and installing a strain relief.
- Plug into Grounded Outlet: Once the power cord is securely installed, plug the dryer into a grounded three-prong 120-volt outlet. Do not use extension cords.
5. Final Positioning and Testing
With all connections made and checked:
- Push Dryer into Place: Carefully slide the dryer into its final position, ensuring the vent hose is not compressed and the gas line is not strained.
- Re-Check Leveling: Briefly re-check that the dryer remains level.
- Install Carbon Monoxide Detector: Place a carbon monoxide detector in the laundry area. This is a vital safety device for any home with gas appliances.
- Run a Test Cycle: Turn on the electricity. Run a small test load or a short cycle to confirm the dryer is heating, the drum is turning, and there are no unusual noises or smells. Double-check for any signs of gas leaks or venting issues during operation.
Common Installation Mistakes to Avoid
- Ignoring the manual: Always consult your specific dryer’s manual; instructions can vary by model.
- Forgetting the leak test: This is a critical safety oversight.
- Using incorrect venting materials: Plastic or foil vents are fire hazards.
- Crushing or kinking the vent: Leads to poor performance and fire risk.
- Over-tightening gas connections: Can damage threads and cause leaks.
- Not installing a carbon monoxide detector: Essential for early detection of dangerous gases.
- Attempting electrical or gas work without confidence: If unsure, always call a professional.
When to Call a Professional
While this guide covers the general steps, certain situations warrant professional assistance:
- New Gas Line Installation: If you don’t have an existing gas line in your laundry room.
- Complex Venting Paths: If your venting path is unusually long, requires multiple bends, or goes through complex wall structures.
- Unfamiliarity with Gas/Electrical Work: If you are uncomfortable or inexperienced with making gas or electrical connections.
- Persistent Gas Leaks: If your leak test reveals bubbles and you cannot resolve the leak after re-tightening.
- Local Code Requirements: Some local codes may require professional installation for gas appliances.
Maintaining Your Gas Dryer for Continued Safety
Once installed, ongoing maintenance ensures your dryer continues to operate safely and efficiently.
- Clean the Lint Filter: After every load, clean the lint filter. A clogged filter restricts airflow and is a leading cause of dryer fires.
- Inspect Venting Annually: Periodically check the exterior vent hood for blockages (like bird nests) and inspect the entire vent run for any kinks, damage, or lint buildup.
- Check Gas Connections: Every few months, quickly check the gas line connections for any signs of wear or looseness, though significant issues should be caught during initial leak tests.
- Carbon Monoxide Detector: Regularly test your carbon monoxide detector to ensure it’s functioning correctly.
Installing a gas dryer safely is a manageable task for many homeowners, but it requires careful attention to detail and a strong commitment to safety protocols. By following this comprehensive guide, you’re well on your way to enjoying the convenience of your new appliance with complete confidence. Remember, when in doubt, a professional is always the safest option.
What steps will you take first to ensure a smooth and safe gas dryer installation in your home?
Frequently Asked Questions
What type of gas line connector should I use for my gas dryer?
You should always use a new, CSA International approved flexible gas line connector. Never reuse old connectors, as they can weaken over time and lead to dangerous leaks. Ensure it’s the correct length to avoid stretching or kinking.
How do I check for gas leaks after installation?
After connecting the gas line and turning the gas back on, mix dish soap and water to create a generous amount of soapy solution. Apply this solution to all gas connections. If you see bubbles forming, it indicates a gas leak, and you must immediately turn off the gas, tighten the connection, and retest until no bubbles appear.
Can I use a plastic or foil vent hose for a gas dryer?
No, it is critically important to never use plastic or flexible foil ducting for a gas dryer. These materials are prone to collapsing, crushing, trapping lint, and are not fire-resistant. Always use rigid metal or semi-rigid metal ducting for safe operation.
What is the maximum length for a gas dryer vent?
While specific recommendations vary by dryer model, a general guideline is to keep the total vent run, including any bends, to a maximum of 25 feet. Each 90-degree bend typically counts as 5 feet of straight duct. Shorter and straighter runs provide better airflow and reduce fire risk.
Is a carbon monoxide detector necessary with a gas dryer?
Absolutely. A carbon monoxide detector is a vital safety device for any home with gas appliances, including gas dryers. Carbon monoxide is an odorless, colorless gas that can be deadly, and a detector provides an early warning in case of a leak or improper venting.