Has your clothes dryer stopped tumbling, or perhaps you’re hearing unusual noises during its cycle? A common culprit behind these issues is often a broken or worn-out dryer belt. While the idea of disassembling a major appliance might seem daunting, replacing a clothes dryer belt is a straightforward DIY repair that can save you significant time and money on professional service. With the right tools and a careful, step-by-step approach, you can restore your dryer’s functionality and get your laundry routine back on track. This guide will walk you through every step of the process, from understanding the problem to confidently testing your repaired appliance.
Understanding Your Dryer Belt: What It Does and Why It Breaks
The dryer belt is a critical component that wraps around the dryer drum, connecting it to the motor pulley and an idler pulley. When the motor spins, the belt transmits that rotational energy to the drum, allowing your clothes to tumble and dry evenly. Without a functional belt, the drum cannot rotate, leading to clothes remaining damp even if the dryer appears to be running.
Common reasons for a dryer belt to break include:
- Wear and Tear: Over time, continuous use causes the belt material to degrade, leading to cracks, fraying, or eventual snapping.
- Overloading: Consistently stuffing the dryer with too many heavy items puts excessive strain on the belt, accelerating its wear.
- Seized Components: A malfunctioning idler pulley or drum rollers can cause increased friction and stress on the belt, leading to premature failure.
The most obvious sign of a broken dryer belt is a drum that doesn’t spin, even though you can hear the motor humming. Other indicators might include squealing or grinding noises coming from the dryer, which could suggest a severely worn or misaligned belt that’s about to fail.
Safety First: Essential Precautions Before You Start
Before you begin any DIY appliance repair, prioritize safety. Working with electrical appliances carries inherent risks, but these can be minimized by taking proper precautions.
Always begin by disconnecting your dryer from its power source. For electric dryers, simply unplug the power cord from the wall outlet. If you have a gas dryer, you must also locate and shut off the gas supply valve to the appliance, then disconnect the gas line. Failure to do so could result in electrical shock or a gas leak. It is also advisable to wear work gloves to protect your hands from sharp edges and components inside the dryer.
“Safety is paramount in any home repair. Always ensure power and gas supplies are completely disconnected before touching internal components. This simple step can prevent serious accidents.”
Gathering Your Tools and Supplies
Having the right tools on hand will make the replacement process much smoother and more efficient. Before you start, gather the following:
- New Dryer Belt: This is crucial. Ensure you purchase a replacement belt specifically designed for your dryer’s make and model. The model number is usually found on a sticker inside the dryer door or on the back panel.
- Screwdrivers: You’ll likely need Phillips head and flathead screwdrivers, and possibly a nut driver set for hex-head screws.
- Putty Knife or Flat-Blade Tool: Useful for prying open panels that are held by spring clips.
- Pliers: Needle-nose pliers can be helpful for handling small parts or manipulating the belt around pulleys.
- Work Gloves: To protect your hands from sharp edges and grease.
- Camera/Smartphone: Take photos at each step of the disassembly process. These visual aids will be invaluable when reassembling the dryer.
- Vacuum Cleaner or Shop Vac: To clean out accumulated lint, which is a common fire hazard.
Step-by-Step Guide: Replacing the Dryer Belt
Replacing a dryer belt involves several steps, but by following them carefully, you can successfully complete the repair.
Step 1: Prepare Your Dryer for Access
|
Our Picks for the Best Clothes dryer in 2026
As an Amazon Associate I earn from qualifying purchases.
|
||
| Num | Product | Action |
|---|---|---|
| 1 | Portable Clothes Dryer, 900W Fast Drying & Large Load Capacity for Laundry and Shoes - Compact Mini Dryer Machine for Travel, Apartments, RV, Dorm Blue |

|
| 2 | GE PROFILE 7.2 cu. ft. Vented Electric Dryer in White with Auto Dry and Extended Tumble |
|
| 3 | Euhomy Dryer, 3.5 Cu. Ft. 1500W Clothes Dryer, Stainless Steel Tumble Dryer with Exhaust Hose for Home, Apartment, Dorm, White |
|
| 4 | BLACK+DECKER BCED37 Compact Dryer for Standard Wall Outlet, Small, 4 Modes, Load Volume 13.2 lbs., White |
|
| 5 | Drying Rack Clothing, 3-Tier Clothes Drying Rack Foldable, Antirust Laundry Drying Rack Collapsible Use for Indoor & Outdoor, 11.8" D x 34.6" W x 35.4" H, White |
|
| 6 | HOMIDEC Clothes Drying Rack, Oversized 4-Tier(67.7" High) Foldable Stainless Steel Drying Rack Clothing, Movable Drying Rack with 4 castors, 24 Drying Poles and 14 Hooks for Bed Linen, Clothing, Grey |
|
| 7 | Kenmore 7.0 cu. ft. Front Load Electric Dryer - with Guard to Reduce Wrinkles & Static - Smart Sensor Drying - LED - White |
|
| 8 | MOJOCO Portable Clothes Dryer - Mini/Compact Dryer for Apartment, RV, Travel - Small Quiet Fast-Drying Machine with Adjustable Timer & Hassle-Free Setup |
|
| 9 | Amazon Basics Foldable Portable Clothes Drying Rack for Indoor Air Drying, Collapsible Design, 14.5" D x 29.5" W x 41.8" H, White |
|
| 10 | Sakugi Clothes Drying Rack, Foldable 2-Level Laundry Drying Rack with Height-Adjustable Wings, for Clothing & Bedding, Free-Standing Space-Saving Rack, Indoor & Outdoor, 55.5" L × 22.8" W, Gray |
|
- Unplug and Move: As emphasized, unplug the dryer’s power cord and, if it’s a gas model, shut off and disconnect the gas supply. Then, carefully slide the dryer away from the wall to give yourself ample working space. This is also an excellent time to clean any lint that has accumulated in the exhaust vent.
- Remove the Lint Filter and Screws: Pull out the lint screen from its housing. Often, there are one or two Phillips head screws inside the lint filter housing that secure the top panel. Remove these screws and set them aside in a labeled bag to avoid losing them.
Step 2: Access the Dryer’s Interior
- Raise the Top Panel: Most dryers have spring clips holding the top panel in place. Insert a putty knife or a flat-blade screwdriver into the seam between the top and front panels, usually near the front corners. Gently pry upwards to release the clips. Once released, lift the top panel and prop it securely against the wall or use a bungee cord to hold it up.
- Disconnect Electrical Components (If Necessary): Depending on your dryer model, you may find wire harnesses connecting the top panel or door switch to the main body. Carefully disconnect these by pressing the release tabs. If the wiring seems complex, take a photograph to remember the connections for reassembly.
- Remove the Front Panel: Look for screws along the inside of the dryer’s top edge and sides that secure the front panel. Use the appropriate screwdriver or nut driver to remove them. Some front panels also sit on hangers at the bottom; you may need to lift the panel slightly, then pull it forward and away from the main frame. Carefully set the front panel aside.
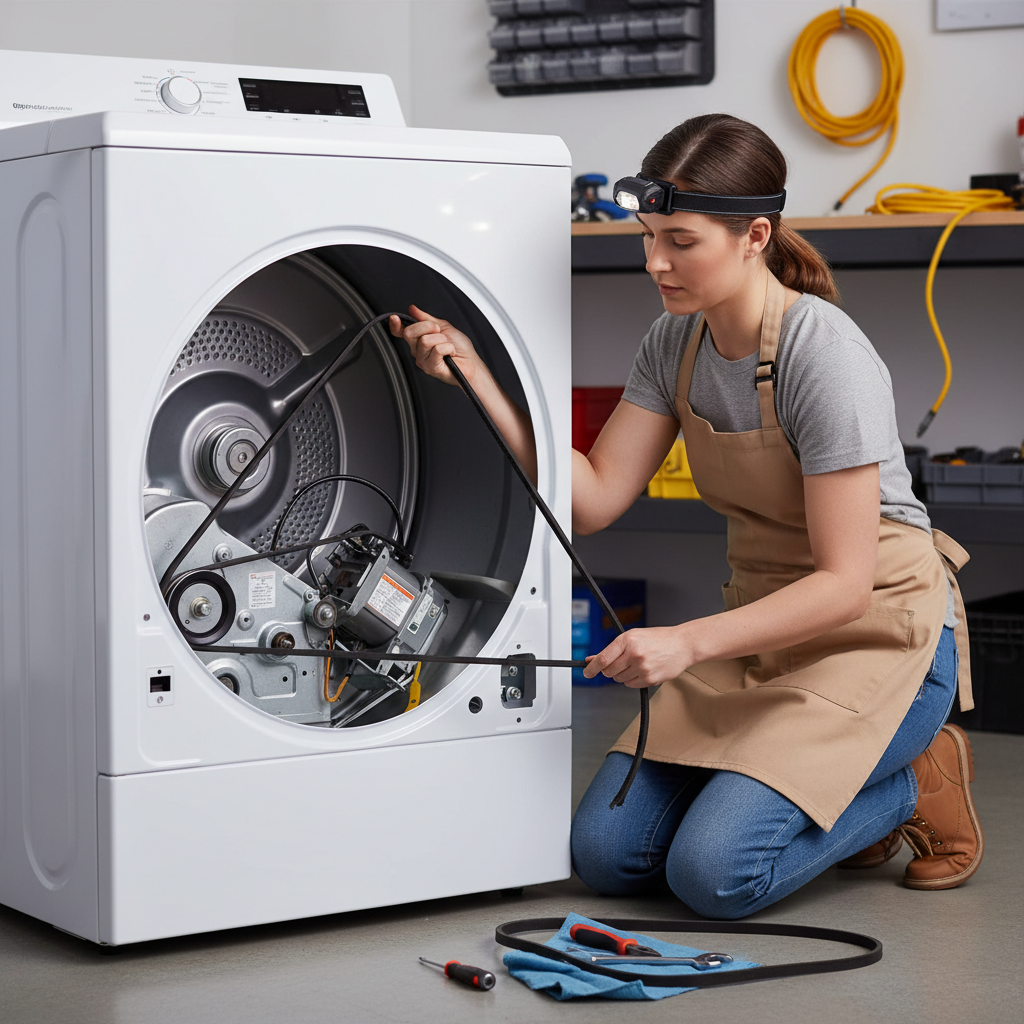
Step 3: Remove the Old Belt and Install the New One
- Locate and Remove the Broken Belt: With the front panel off, you should have a clear view of the dryer drum and its internal components. If the belt is broken, it will likely be lying at the bottom of the dryer cavity. Pull out any remnants of the old belt.
- Tip: While the dryer is open, take advantage of the access to thoroughly vacuum out any accumulated lint and dust from the interior, especially around the motor and heating element. This helps prevent fire hazards and improves efficiency.
- Position the New Belt on the Drum: Drape the new dryer belt around the circumference of the dryer drum, making sure it sits correctly in the groove that runs around the drum’s middle. The ribbed or grooved side of the belt should face inward, contacting the drum.
- Route the Belt Around the Pulleys: This is often the trickiest part. You’ll need to lift the front of the drum slightly to access the motor pulley and the idler pulley located at the bottom of the dryer.
- Idler Pulley: The idler pulley provides tension to the belt. Thread the belt through the idler pulley first. It typically wraps around one side of the idler pulley, then under it, then around the motor pulley.
- Motor Pulley: Push the idler pulley to the right (or in the direction that creates slack) to allow you to loop the belt over the motor pulley. Release the idler pulley, and it will spring back, creating tension on the new belt.
- Crucial Check: Double-check that the belt is correctly routed around both pulleys and that it’s not twisted. Gently spin the drum by hand a few times to ensure the belt tracks smoothly and is centered on both pulleys.
Step 4: Reassemble the Dryer
- Reinstall the Front Panel: Carefully align the front panel with the dryer’s frame, ensuring any bottom hangers are correctly seated. Reattach all screws you removed in Step 2. If you disconnected any electrical harnesses for the door switch, reconnect them now, making sure the locking tabs engage.
- Reassemble the Top Panel: Lower the top panel back into place, ensuring the clips snap securely. Reinstall the screws that hold the lint filter housing to the top panel.
- Final Checks: Give the front and top panels a gentle shake to ensure they are firmly attached and there’s no wobbling.
Step 5: Test Your Dryer
- Restore Power: Slide the dryer back into its original position. Reconnect the power cord to the wall outlet. If it’s a gas dryer, reconnect the gas line and turn the gas supply valve back on.
- Run a Test Cycle: Run a short cycle with an empty drum. Observe the drum to confirm it’s spinning smoothly and quietly. Listen for any unusual noises that might indicate a problem with the belt routing or other components. If everything sounds and looks normal, your dryer is ready for use!
Troubleshooting Common Issues After Replacement
Even with a careful DIY approach, you might encounter a few issues after replacing your dryer belt.
- Dryer Drum Not Spinning (or makes grinding noise):
- Belt Misrouted: The most common issue. The belt might not be correctly positioned on the motor or idler pulley, or it could be twisted. Review your photos and re-route the belt carefully.
- Idler Pulley Stuck: The idler pulley might be seized or not applying proper tension. Check if it spins freely and if its spring mechanism is working.
- Motor Failure: If the drum still doesn’t spin and the motor hums loudly without the belt moving, the motor itself might be faulty.
- New Belt Breaking Quickly:
- Overloading: Avoid overloading your dryer.
- Worn Rollers/Bearings: Worn drum rollers or a seized rear drum bearing can put undue stress on the belt. While replacing the belt, it’s a good idea to inspect these components for wear.
- Unusual Noises (Squeaking, Thumping):
- Belt Not Centered: The belt might be rubbing against the drum or other parts if not perfectly centered on its path.
- Worn Drum Rollers: Old, worn drum rollers are a common cause of squeaking or thumping noises. If you’ve opened your dryer, it’s a good time to check these and lubricate or replace them if necessary.
When to Call a Professional
While replacing a dryer belt is a manageable DIY task, there are instances where calling a professional appliance technician is the best course of action:
- Uncertainty or Discomfort: If you feel unsure at any point during the repair process or are uncomfortable working with electrical or gas components.
- Complex Dryer Models: Some high-end or older dryer models can have more intricate disassembly processes.
- Other Component Failures: If you suspect the motor, heating element, or other major components are also failing, a professional can accurately diagnose and repair the issue.
By following this guide, you can confidently tackle replacing a broken dryer belt yourself, saving money and gaining a valuable understanding of your appliance. What other home appliance repairs do you plan to conquer next?
Frequently Asked Questions
Can I use an alternative dryer belt if I can’t find the exact model-specific one?
It is strongly recommended to use the exact model-specific replacement belt for your dryer. While some aftermarket belts claim compatibility, using an incorrect size or type can lead to improper tension, premature wear, or further damage to your dryer’s components. Always match the belt to your dryer’s model number for optimal performance and safety.
Is it possible to access the dryer belt from the back of the machine?
On most modern clothes dryers, accessing the belt and drum assembly is primarily done through the front and top panels. While some older or commercial models might allow for rear access, it’s generally more difficult and less common. Always refer to your dryer’s service manual or a repair guide specific to your model for the most accurate disassembly instructions.
My dryer still isn’t spinning after I replaced the belt. What could be wrong?
If your dryer still doesn’t spin after installing a new belt, first re-check the belt’s routing to ensure it’s correctly seated on the motor and idler pulleys and not twisted. If the belt is installed correctly, the issue might be with other components such as the motor itself, the motor’s centrifugal switch, the idler pulley (if it’s seized), or even a faulty door switch that prevents the dryer from starting.