Is your appliance acting up, refusing to heat, or simply not turning on? The culprit might be a tiny yet critical component: the thermal fuse. Designed as a vital safety mechanism, a blown thermal fuse can bring your entire appliance to a halt. Fortunately, diagnosing this issue is often straightforward with the right tools and a little know-how. This guide will walk you through the essential steps to accurately test a thermal fuse using a multimeter, ensuring your home appliances can get back to business safely and efficiently.
Understanding Thermal Fuses: A Critical Safety Component
A thermal fuse is a single-use safety device that protects electrical appliances from overheating. Unlike a circuit breaker that can be reset, a thermal fuse is designed to permanently open its circuit when its internal temperature exceeds a specified limit. This action stops the flow of electricity to potentially damaged components, preventing further damage to the appliance or, more critically, reducing the risk of fire.
Common reasons for a thermal fuse to blow often involve issues that lead to excessive heat, such as clogged lint vents in dryers, faulty heating elements, or problems with motors that cause the appliance to work harder and generate more heat. Understanding its function is the first step in diagnosing why your appliance might have failed.
When and Why to Test Your Thermal Fuse
You should consider testing your thermal fuse if you notice any of the following symptoms with your appliance:
- The appliance completely fails to start, even though it’s receiving power.
- A dryer drum spins, but there is no heat produced.
- The appliance stops unexpectedly mid-cycle.
- You detect frequent overheating or the appliance feels hotter than usual during operation.
These signs suggest that the thermal fuse might have sacrificed itself to protect your appliance from a dangerous overheating scenario. Testing it is a crucial diagnostic step before delving into more complex component checks.
Essential Tools and Safety Preparations
Before you begin any electrical testing or repairs, gathering the correct tools and prioritizing safety are paramount.
Tools You’ll Need:
- Multimeter: This is the star of the show. Ensure it can measure continuity or resistance (Ohms). Both digital and analog multimeters will work.
- Screwdrivers: You’ll likely need both Phillips and flathead screwdrivers to access the appliance’s interior panels.
- Work Gloves: To protect your hands from sharp edges inside the appliance.
- Flashlight: Appliances often have dark corners, and good visibility is key to locating components.
Safety First:
Always remember these critical safety precautions:
- Disconnect Power: Unplug the appliance from the wall outlet or switch off the corresponding circuit breaker before touching any internal components. This is the most crucial step to prevent electrical shock.
- Avoid Direct Contact: Do not touch any metal parts inside the dryer directly with your bare hands.
- Work in a Safe Environment: Ensure your workspace is well-lit and well-ventilated.
- Consult Your Manual: If unsure about component locations or disassembly, refer to your appliance’s owner’s manual.
“Safety should always be your top priority when dealing with any electrical appliance. Disconnecting power isn’t just a recommendation; it’s a non-negotiable step to protect yourself from severe injury.” – Dr. Eleanor Vance, Electrical Safety Consultant
Step-by-Step: Testing a Thermal Fuse with a Multimeter
Testing a thermal fuse for continuity is a straightforward process. Follow these steps carefully:
Step 1: Disconnect Power and Access the Appliance
|
Our Picks for the Best Clothes dryer in 2026
As an Amazon Associate I earn from qualifying purchases.
|
||
| Num | Product | Action |
|---|---|---|
| 1 | BLACK+DECKER BCED37 Compact Dryer for Standard Wall Outlet, Small, 4 Modes, Load Volume 13.2 lbs., White |

|
| 2 | Kenmore 7.0 cu. ft. Front Load Electric Dryer - with Guard to Reduce Wrinkles & Static - Smart Sensor Drying - LED - White |
|
| 3 | HOMIDEC Clothes Drying Rack, Oversized 4-Tier(67.7" High) Foldable Stainless Steel Drying Rack Clothing, Movable Drying Rack with 4 castors, 24 Drying Poles and 14 Hooks for Bed Linen, Clothing, Grey |
|
| 4 | Sakugi Clothes Drying Rack, Foldable 2-Level Laundry Drying Rack with Height-Adjustable Wings, for Clothing & Bedding, Free-Standing Space-Saving Rack, Indoor & Outdoor, 55.5" L × 22.8" W, Gray |
|
| 5 | Amazon Basics Foldable Portable Clothes Drying Rack for Indoor Air Drying, Collapsible Design, 14.5" D x 29.5" W x 41.8" H, White |
|
| 6 | Portable Clothes Dryer, 900W Fast Drying & Large Load Capacity for Laundry and Shoes - Compact Mini Dryer Machine for Travel, Apartments, RV, Dorm Blue |
|
| 7 | Drying Rack Clothing, 3-Tier Clothes Drying Rack Foldable, Antirust Laundry Drying Rack Collapsible Use for Indoor & Outdoor, 11.8" D x 34.6" W x 35.4" H, White |
|
| 8 | MOJOCO Portable Clothes Dryer - Mini/Compact Dryer for Apartment, RV, Travel - Small Quiet Fast-Drying Machine with Adjustable Timer & Hassle-Free Setup |
|
| 9 | Euhomy Dryer, 3.5 Cu. Ft. 1500W Clothes Dryer, Stainless Steel Tumble Dryer with Exhaust Hose for Home, Apartment, Dorm, White |
|
| 10 | GE PROFILE 7.2 cu. ft. Vented Electric Dryer in White with Auto Dry and Extended Tumble |
|
As emphasized, unplug your appliance completely from its power source. Once disconnected, use your screwdrivers to remove any access panels or covers necessary to reach the internal components. The specific location of these panels varies by appliance model.
Step 2: Locate the Thermal Fuse
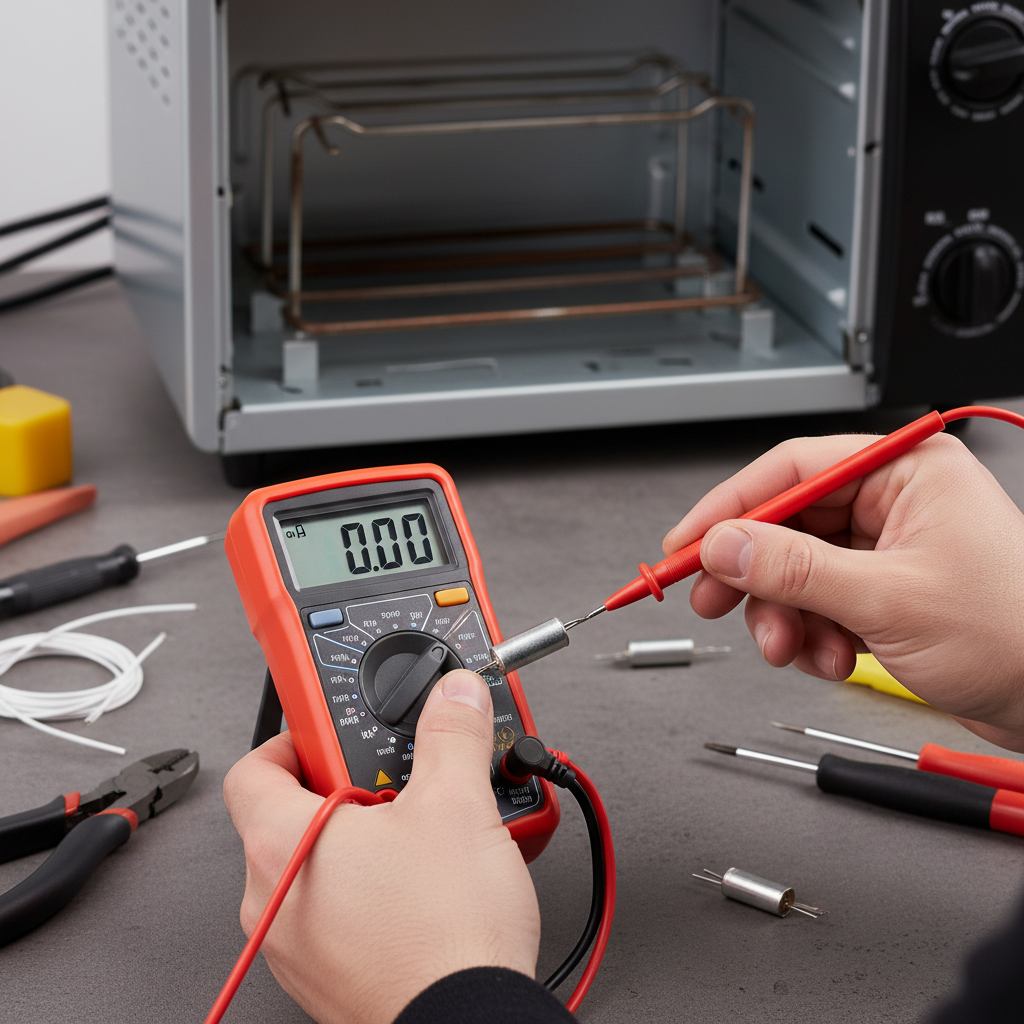
The thermal fuse is typically a small, cylindrical or rectangular component, usually white or silver, with two wires connected to it. In dryers, it’s commonly found on the blower housing or near the heating element. For other appliances like ovens or microwaves, it will be situated where it can monitor temperatures effectively. If you’re struggling to find it, consult your appliance’s service manual.
Step 3: Disconnect the Thermal Fuse Wires
Carefully disconnect the two wires attached to the thermal fuse. These are often held by metal slip-on connectors. Gently pull on the connectors themselves, not the wires, to avoid damaging the wiring. Taking a photo before disconnecting can be helpful for correct reassembly.
Step 4: Prepare Your Multimeter
Set your multimeter to the continuity testing mode. This setting is often indicated by a symbol resembling a speaker or five curved lines. If your multimeter has an audible continuity test feature, it will beep when a continuous circuit is detected. If it only has resistance settings, set it to the lowest ohms (Ω) range, typically 200 Ω or R X 1 for analog meters.
Before testing the fuse, touch the two multimeter probes together. The meter should read near zero ohms (or beep if in continuity mode), indicating that the probes and meter are functioning correctly and have a continuous circuit.
Step 5: Perform the Continuity Test
With the thermal fuse disconnected from the appliance’s wiring, touch one multimeter probe to each terminal of the thermal fuse. It does not matter which probe touches which terminal.
Interpreting Your Multimeter Readings
The reading on your multimeter will tell you whether the thermal fuse is intact or has blown.
-
Good Fuse (Continuous):
- Continuity Mode: The multimeter will produce an audible beep, or display a “1” indicating continuity.
- Resistance Mode (Ohms): The multimeter will show a reading very close to zero ohms (e.g., 0.0 to 0.5 Ω). This indicates a closed circuit, meaning electricity can flow through the fuse.
-
Blown Fuse (Open Circuit):
- Continuity Mode: The multimeter will remain silent, and the display might show “OL” (Over Limit), “Open,” or no change from its initial state when probes are not touching.
- Resistance Mode (Ohms): The multimeter will display “OL” (Over Limit), “infinity,” or a very high resistance reading. This indicates an open circuit, meaning electricity cannot flow through the fuse.
If your multimeter indicates an open circuit, the thermal fuse is blown and needs to be replaced.
Beyond the Test: What to Do Next
If the Fuse is Good
If your thermal fuse tests good (showing continuity), it means the problem lies elsewhere in your appliance. You’ll need to continue troubleshooting other components like the heating element, thermostat, motor, or selector switches, depending on the appliance and its specific symptoms.
If the Fuse is Blown
If the thermal fuse is indeed blown, it must be replaced. It is crucial to replace it with an exact match in terms of temperature rating and specifications to ensure the continued safe operation of your appliance. A blown thermal fuse is often a symptom of an underlying issue, not the root cause itself. Therefore, it’s highly recommended to investigate why the fuse blew. Check for:
- Clogged Vents: Especially common in dryers, restricted airflow causes heat to build up. Clean all lint traps and exhaust ducts thoroughly.
- Faulty Heating Element: A damaged heating element can overheat.
- Malfunctioning Thermostat: A faulty operating or high-limit thermostat might not be regulating temperature correctly.
- Motor Problems: If the motor is struggling, it can generate excess heat.
Addressing the root cause will prevent the new thermal fuse from blowing again shortly after replacement.
Conclusion
Testing a thermal fuse with a multimeter is a fundamental troubleshooting skill that can save you time and money on appliance repairs. By following the proper safety procedures and using your multimeter correctly, you can accurately diagnose whether a blown thermal fuse is preventing your appliance from functioning. Remember, while replacing a thermal fuse is straightforward, always identify and resolve the underlying cause of overheating to ensure the long-term safety and efficiency of your appliance. Don’t let a small fuse keep your household running smoothly! What other appliance troubleshooting skills are you eager to master?
Frequently Asked Questions
What does “OL” mean on a multimeter when testing a thermal fuse?
“OL” stands for “Over Limit” or “Open Line” on a digital multimeter. When testing a thermal fuse in continuity or resistance mode, an “OL” reading indicates that there is an open circuit within the fuse. This means the fuse has blown, and electricity cannot pass through it, signifying it needs to be replaced.
Can I bypass a thermal fuse temporarily to test an appliance?
No, you should never bypass a thermal fuse. Thermal fuses are critical safety devices designed to prevent overheating and potential fires. Bypassing it removes this protection, creating a significant safety hazard and risking damage to the appliance or even your home. Always replace a blown thermal fuse with a new one of the exact specifications.
How do I know the correct replacement thermal fuse for my appliance?
The correct replacement thermal fuse must match the original’s specifications, including its temperature rating and electrical characteristics. You can usually find this information printed on the fuse itself, in your appliance’s service manual, or by looking up your appliance’s model number on a parts supplier’s website. Using an incorrect fuse can be dangerous.
What’s the difference between a thermal fuse and a thermostat?
While both respond to temperature, a thermal fuse is a single-use safety device that permanently breaks a circuit when its limit is exceeded. A thermostat, on the other hand, is a reusable control device that cycles on and off to maintain a specific temperature range. If a thermostat fails, it might lead to a thermal fuse blowing due to uncontrolled overheating.