Is the rhythmic squeak of your clothes dryer turning laundry day into an irritating chore? You’re not alone. A noisy dryer drum is a common household annoyance that can signal anything from a minor adjustment to a worn-out component. While it might seem daunting, many dryer drum squeaks can be effectively resolved with a bit of DIY know-how and the right tools. This guide will walk you through diagnosing the most common causes of a squeaky clothes dryer drum and provide clear, step-by-step instructions to get your appliance running quietly and efficiently once more.
Understanding the Squeak: Common Causes of a Noisy Dryer Drum
When your clothes dryer emits an unwelcome squeak, it’s typically a sign of friction between moving parts. Pinpointing the exact source is the first crucial step in any successful DIY repair. Understanding these common culprits will help you diagnose the issue accurately.
Worn Drum Rollers or Support Wheels
|
Our Picks for the Best Clothes dryer in 2026
As an Amazon Associate I earn from qualifying purchases.
|
||
| Num | Product | Action |
|---|---|---|
| 1 | Euhomy Dryer, 3.5 Cu. Ft. 1500W Clothes Dryer, Stainless Steel Tumble Dryer with Exhaust Hose for Home, Apartment, Dorm, White |

|
| 2 | BLACK+DECKER BCED37 Compact Dryer for Standard Wall Outlet, Small, 4 Modes, Load Volume 13.2 lbs., White |
|
| 3 | Amazon Basics Foldable Portable Clothes Drying Rack for Indoor Air Drying, Collapsible Design, 14.5" D x 29.5" W x 41.8" H, White |
|
| 4 | Portable Clothes Dryer, 900W Fast Drying & Large Load Capacity for Laundry and Shoes - Compact Mini Dryer Machine for Travel, Apartments, RV, Dorm Blue |
|
| 5 | MOJOCO Portable Clothes Dryer - Mini/Compact Dryer for Apartment, RV, Travel - Small Quiet Fast-Drying Machine with Adjustable Timer & Hassle-Free Setup |
|
| 6 | Kenmore 7.0 cu. ft. Front Load Electric Dryer - with Guard to Reduce Wrinkles & Static - Smart Sensor Drying - LED - White |
|
| 7 | Drying Rack Clothing, 3-Tier Clothes Drying Rack Foldable, Antirust Laundry Drying Rack Collapsible Use for Indoor & Outdoor, 11.8" D x 34.6" W x 35.4" H, White |
|
| 8 | Sakugi Clothes Drying Rack, Foldable 2-Level Laundry Drying Rack with Height-Adjustable Wings, for Clothing & Bedding, Free-Standing Space-Saving Rack, Indoor & Outdoor, 55.5" L × 22.8" W, Gray |
|
| 9 | GE PROFILE 7.2 cu. ft. Vented Electric Dryer in White with Auto Dry and Extended Tumble |
|
| 10 | HOMIDEC Clothes Drying Rack, Oversized 4-Tier(67.7" High) Foldable Stainless Steel Drying Rack Clothing, Movable Drying Rack with 4 castors, 24 Drying Poles and 14 Hooks for Bed Linen, Clothing, Grey |
|
The dryer drum rests on a set of rollers, often located at the rear and sometimes the front, which allow it to rotate smoothly. Over time, these rollers can become worn, flat-spotted, or seize up due to accumulated lint and debris, leading to a persistent squeaking or thumping sound. The shafts supporting these rollers can also become worn, contributing to the noise.
Faulty Idler Pulley
The idler pulley maintains tension on the drive belt, ensuring it stays taut and properly spins the dryer drum. If the idler pulley’s bearing wears out, it can produce a distinct squealing or chirping noise as it rotates with the belt. This component is under constant stress and is a frequent source of dryer noise.
Worn or Loose Drive Belt
The drive belt is a long, slender strap that encircles the dryer drum and connects to the motor. If this belt becomes frayed, cracked, or stretched, it can slip or rub against other components, resulting in a high-pitched squeak. A completely broken belt will prevent the drum from spinning altogether.
Damaged Drum Glides or Front Bearings
Many dryers use drum glides (also known as slides or pads) at the front of the drum to provide support and reduce friction as the drum tumbles. Made of materials like Teflon or nylon, these glides can wear down, causing metal-on-metal contact and a noticeable scraping or squeaking sound. In some models, a central rear drum bearing performs a similar function and can squeak if unlubricated or worn.
Other Potential Factors
While less common for a direct drum squeak, an unlevel dryer can cause the appliance to vibrate and transfer noise to the drum. Similarly, loose outer panels could rattle, mimicking internal squeaks. It’s always a good idea to ensure your dryer is level and all external panels are securely fastened before delving into internal repairs.
Safety First: Essential Steps Before Any Dryer Repair
Before you pick up a single tool, prioritizing safety is paramount when working with any appliance. Skipping these critical steps can lead to serious injury or damage to your dryer.
Always begin by disconnecting your dryer from its power source. For electric dryers, this means unplugging the power cord from the wall outlet. For gas dryers, you must unplug the electrical cord AND turn off the gas supply valve, which is typically located behind the dryer. Never assume the power is off without physically disconnecting it.
Next, consult your dryer’s owner’s manual. This invaluable resource provides model-specific instructions for disassembly, part identification, and reassembly. It can also guide you to the exact location of components and any unique features of your particular machine. If you don’t have a physical copy, most manufacturers offer digital versions online.
Finally, gather all the necessary tools before you start. Having everything within reach will streamline the repair process and prevent interruptions. Ensure your workspace is well-lit and clear of obstructions. Wear appropriate safety gear, such as work gloves, to protect your hands from sharp edges or grime.
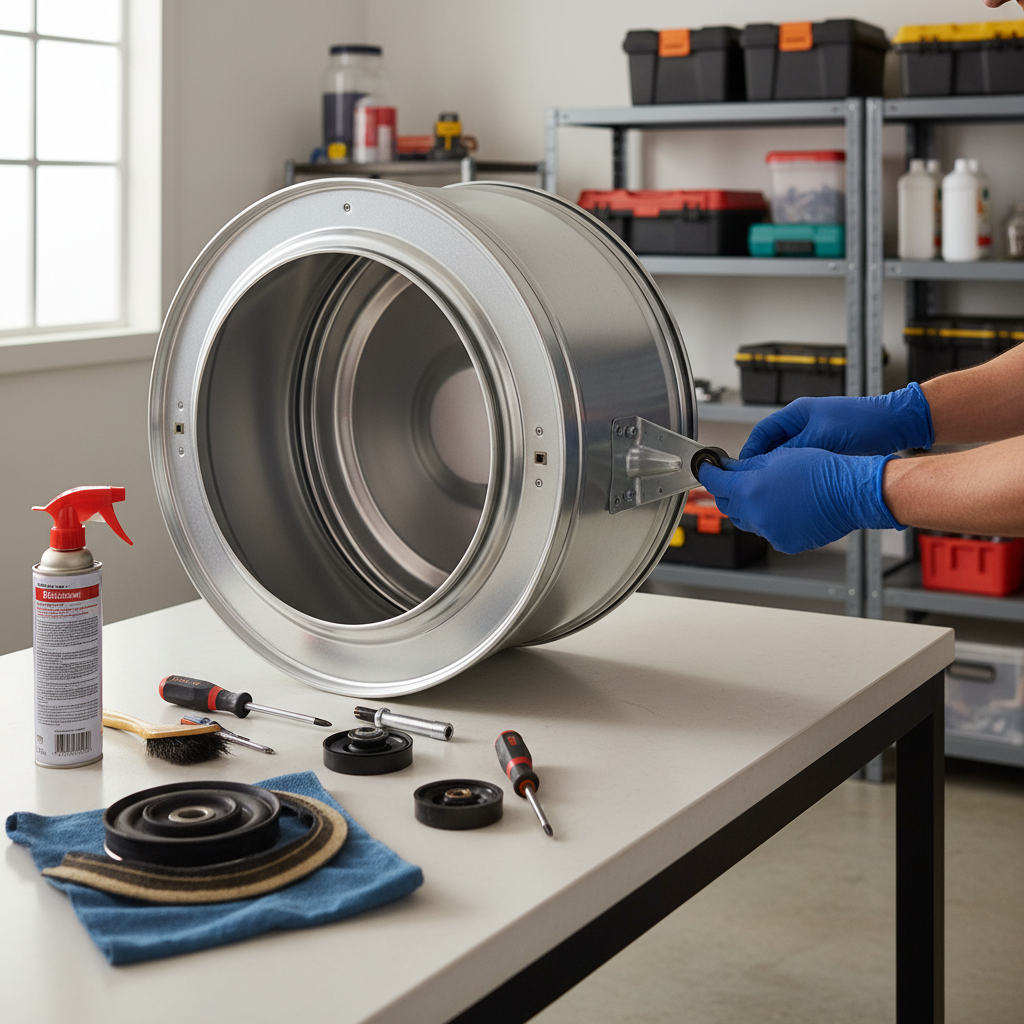
Tools You’ll Need for Dryer Drum Repair
A successful DIY repair requires the right arsenal of tools. While specific models may vary, here’s a list of common implements you’ll likely need to tackle a squeaky dryer drum:
- Screwdrivers: Phillips-head and flat-head screwdrivers of various sizes are essential for removing panels and internal components.
- Nut Drivers or Socket Set: Many dryer panels and internal parts are secured with hex-head screws or nuts.
- Pliers: Useful for gripping and manipulating small parts or spring clips.
- Flashlight: To illuminate the dryer’s dark interior and inspect components closely.
- Vacuum Cleaner (with attachments): Crucial for clearing accumulated lint and debris, which can contribute to friction and fire hazards.
- Work Gloves: To protect your hands from sharp edges and grease.
- Putty Knife or Flat Blade: Often used to release clips or pry open panels without causing damage.
- Silicone-Based Lubricant (sparingly): For lubricating certain metal-on-metal contact points, though replacement is often preferred for worn parts. Avoid using general-purpose oils like WD-40 on rubber or plastic components, as they can degrade these materials.
- Replacement Parts: Depending on your diagnosis, you might need a dryer repair kit that includes new drum rollers, an idler pulley, a drive belt, or drum glides. Ensure these parts are compatible with your specific dryer model.
Step-by-Step DIY Guide to Fixing Your Squeaky Dryer Drum
Ready to silence that squeak? Follow these steps carefully to diagnose and repair your dryer drum. Remember, specifics may vary by model, so refer to your owner’s manual.
Step 1: Disconnect Power and Access the Interior
Safety first! Unplug your electric dryer from the wall outlet. If you have a gas dryer, also turn off the gas supply valve.
Next, you’ll need to open up your dryer. For most top-filter models (like many Kenmore, Whirlpool, Maytag), you’ll typically remove two screws located in the lint trap housing or under the front edge of the top panel. Use a putty knife to release clips and lift the top panel. Then, disconnect the wires to the door switch and remove the front panel by detaching retaining clips or screws. Some models require removing the back panel instead. Vacuum out any visible lint and debris as you go.
Step 2: Inspect the Drive Belt and Idler Pulley
Once the dryer drum is exposed, you’ll see the drive belt wrapped around it and looped through the idler pulley.
- Drive Belt: Carefully examine the entire length of the belt for signs of wear, fraying, cracks, or stretching. If it looks compromised, it’s best to replace it. A loose belt might not be visibly damaged but could still be a source of squeaking.
- Idler Pulley: Feel the idler pulley. It should spin freely and smoothly without any grinding or excessive wobble. If it’s stiff, noisy, or feels rough when spun, it likely needs replacement. The idler pulley is crucial for maintaining proper belt tension.
Step 3: Examine Drum Rollers and Shafts
To access the drum rollers (also known as support rollers), you’ll usually need to remove the dryer drum itself. This often involves lifting the drum off the drive belt and idler pulley, then pulling it forward and out.
Once the drum is out, inspect the rollers, which are typically small wheels that support the drum’s weight. Look for:
- Wear and Tear: Are the rollers flat-spotted, cracked, or excessively worn?
- Smoothness: Do they spin freely and quietly? If they squeak or are stiff, they need attention.
- Shafts: Check the roller shafts for wear, nicks, or debris.
Worn rollers are a very common cause of squeaks and are usually replaced as a set.
Step 4: Check Drum Glides and Bearings
With the drum removed, you can also inspect the drum glides located on the front bulkhead where the drum usually rests. These plastic or felt pads provide a smooth surface for the drum. Look for:
- Excessive Wear: Are the glides severely worn down, exposing the metal underneath?
- Damage: Are they cracked or missing?
If glides are worn, they should be replaced. Many dryers also have a rear drum bearing or bushing. Inspect this for wear and ensure it’s not seized. A small amount of high-temperature grease can sometimes quiet a dry bearing, but often replacement is the best solution for significant wear.
Step 5: Replace Worn Parts
Once you’ve identified the faulty components, proceed with replacement. Many parts, such as drum rollers, idler pulleys, and drive belts, are available in convenient repair kits designed for specific dryer brands and models.
- Rollers/Glides: Remove the old rollers or glides (often held by a nut, clip, or screw) and install the new ones.
- Idler Pulley: Replace the old idler pulley by reversing its installation process.
- Drive Belt: If replacing the belt, ensure it is routed correctly around the drum and idler pulley according to your manual.
Take photos as you disassemble to ensure you remember how everything goes back together.
Step 6: Reassemble and Test
Carefully reassemble your dryer by reversing the disassembly steps. Ensure all wires are reconnected, panels are securely fastened, and no tools are left inside.
Once fully reassembled, plug the dryer back in and turn on the gas supply (if applicable). Run a test cycle with a small load (or no load) and listen intently. Has the squeak disappeared? If so, congratulations – you’ve successfully fixed your squeaky dryer drum!
Common Dryer Parts to Inspect and Replace
Understanding the specific components that frequently cause squeaking noises can significantly aid your DIY repair efforts.
- Drum Rollers (Support Rollers) & Roller Shafts: These are small wheels that support the dryer drum as it spins. They are often found on the rear bulkhead, and sometimes the front. Over time, the plastic or rubber on the rollers can wear flat, crack, or the internal bushings can seize, leading to loud squealing or thumping. It’s recommended to replace them in sets, as they tend to wear evenly.
- Idler Pulley: This component applies tension to the drive belt, keeping it snug against the drum. The idler pulley typically has a bearing that can wear out, causing a high-pitched squeal. If it doesn’t spin freely or feels rough, it’s a prime candidate for replacement.
- Drive Belt: A long, narrow rubber belt that wraps around the dryer drum, allowing the motor to rotate it. A worn, cracked, or stretched belt can slip and squeak. While sometimes lubricated, replacement is usually the solution for a noisy belt.
- Drum Glides (or Slides): These small plastic or felt pads are located on the front bulkhead, providing a low-friction surface for the drum to glide on. When worn, the drum can rub directly against metal, creating a scraping or squeaking sound. They are typically replaced in pairs.
- Rear Drum Bearing: In some dryer models, the rear of the drum is supported by a central bearing rather than rollers. If this bearing becomes dry or worn, it will produce a squeaking or grinding noise. Replacement can be more involved but is essential for smooth drum operation.
“A persistent squeak in your clothes dryer is more than just an annoyance; it’s your appliance telling you it needs attention. Addressing it promptly can prevent further damage and extend your dryer’s lifespan.” – Emma Davies, Appliance Repair Specialist
When to Call a Professional: Knowing Your Limits
While many dryer drum squeaks are fixable with a DIY approach, there are instances when calling a professional appliance technician is the safest and most efficient course of action. Recognizing your limits can save you time, money, and potential hazards.
You should consider professional help if:
- Motor Issues: If your diagnosis points to a failing motor (often characterized by a loud rumbling, grinding, or a complete failure to spin), replacement is typically complex and best left to an expert.
- Complex Electrical Problems: Any issues involving the main electrical components beyond simple wiring connections should be handled by a qualified technician to avoid electrical shock or fire hazards.
- Gas Line Concerns: For gas dryers, if you suspect any issues with the gas valve, igniter, or gas lines, do not attempt to repair it yourself. Gas leaks are extremely dangerous and require immediate professional attention.
- Persistent Issues: If you’ve attempted the common DIY fixes and the squeaking persists, there might be an underlying problem that requires more advanced diagnostic tools and expertise.
- Comfort Level: If you are uncomfortable with disassembling the dryer, working with internal components, or simply lack the time or confidence to perform the repair, a professional can provide peace of mind.
A professional technician has the experience, specialized tools, and knowledge to accurately diagnose complex problems and ensure repairs are done safely and correctly, keeping your household safe and your dryer functioning optimally.
Conclusion
A squeaky clothes dryer drum can be a real nuisance, but with a bit of patience and this DIY guide, you’re well-equipped to tackle the problem head-on. By understanding the common causes—from worn drum rollers and idler pulleys to frayed drive belts and damaged glides—you can accurately diagnose the source of the noise. Taking the time to safely access your dryer’s interior, carefully inspect components, and replace worn parts can restore peace and quiet to your laundry routine. The satisfaction of a successful DIY repair, coupled with the extended life of your clothes dryer, is a reward well worth the effort. So, which part do you suspect is causing your dryer’s noisy protest?
Frequently Asked Questions
Is it safe to use a dryer that is squeaking?
While a squeaky dryer isn’t an immediate fire hazard in most cases, it indicates a mechanical issue that should be addressed promptly. Ignoring the squeak can lead to further damage to components, increased wear, and potentially more serious problems down the line, so it’s best to investigate and repair it.
What kind of lubricant should I use on dryer parts?
For dryer parts like roller shafts or some bearings, a high-temperature, silicone-based lubricant or white lithium grease is generally recommended. However, avoid using lubricants like WD-40 on rubber or plastic components as they can degrade these materials. Always consult your dryer’s manual for specific lubrication recommendations or opt for replacement of worn parts.
How long do dryer drum rollers last?
Dryer drum rollers typically last between 5 to 10 years, depending on usage frequency, load sizes, and maintenance. Signs of wear like squeaking, thumping, or visible flat spots usually indicate it’s time for replacement.
Can a clogged lint trap cause a dryer to squeak?
A clogged lint trap primarily restricts airflow, forcing the dryer to work harder and potentially overheat. While it doesn’t directly cause a drum squeak, persistent overworking due to poor airflow can put strain on the motor and other moving parts, potentially contributing to premature wear that could lead to squeaking. Regular cleaning of the lint trap is crucial for efficiency and safety.
How do I find my dryer’s model number for parts?
The model number for your dryer is usually located on a sticker or plate inside the dryer door, on the front panel near the door, on the back of the unit, or sometimes on the side. This number is essential for ordering the correct replacement parts.