A non-spinning clothes dryer can abruptly halt your laundry routine, transforming a simple chore into a frustrating puzzle. When your trusty appliance decides to cease its tumbling action, leaving clothes damp and waiting, it’s easy to feel overwhelmed. However, many common reasons for a dryer drum refusing to spin can be diagnosed and resolved with a bit of DIY know-how, saving you the cost and inconvenience of a professional service call. This comprehensive guide will empower you to understand, troubleshoot, and fix the most frequent culprits behind a clothes dryer that won’t spin, helping you get your laundry back on track with confidence.
Understanding Your Clothes Dryer: Types and Basic Operation
|
Our Picks for the Best Clothes dryer in 2026
As an Amazon Associate I earn from qualifying purchases.
|
||
| Num | Product | Action |
|---|---|---|
| 1 | HOMIDEC Clothes Drying Rack, Oversized 4-Tier(67.7" High) Foldable Stainless Steel Drying Rack Clothing, Movable Drying Rack with 4 castors, 24 Drying Poles and 14 Hooks for Bed Linen, Clothing, Grey |

|
| 2 | BLACK+DECKER BCED37 Compact Dryer for Standard Wall Outlet, Small, 4 Modes, Load Volume 13.2 lbs., White |
|
| 3 | GE PROFILE 7.2 cu. ft. Vented Electric Dryer in White with Auto Dry and Extended Tumble |
|
| 4 | Drying Rack Clothing, 3-Tier Clothes Drying Rack Foldable, Antirust Laundry Drying Rack Collapsible Use for Indoor & Outdoor, 11.8" D x 34.6" W x 35.4" H, White |
|
| 5 | Portable Clothes Dryer, 900W Fast Drying & Large Load Capacity for Laundry and Shoes - Compact Mini Dryer Machine for Travel, Apartments, RV, Dorm Blue |
|
| 6 | Amazon Basics Foldable Portable Clothes Drying Rack for Indoor Air Drying, Collapsible Design, 14.5" D x 29.5" W x 41.8" H, White |
|
| 7 | Kenmore 7.0 cu. ft. Front Load Electric Dryer - with Guard to Reduce Wrinkles & Static - Smart Sensor Drying - LED - White |
|
| 8 | MOJOCO Portable Clothes Dryer - Mini/Compact Dryer for Apartment, RV, Travel - Small Quiet Fast-Drying Machine with Adjustable Timer & Hassle-Free Setup |
|
| 9 | Euhomy Dryer, 3.5 Cu. Ft. 1500W Clothes Dryer, Stainless Steel Tumble Dryer with Exhaust Hose for Home, Apartment, Dorm, White |
|
| 10 | Sakugi Clothes Drying Rack, Foldable 2-Level Laundry Drying Rack with Height-Adjustable Wings, for Clothing & Bedding, Free-Standing Space-Saving Rack, Indoor & Outdoor, 55.5" L × 22.8" W, Gray |
|
Before diving into repairs, a foundational understanding of clothes dryer types and their general operation is beneficial. While the core function of drying clothes remains consistent, how they achieve it differs.
Vented Dryers: These are the most common type, expelling hot, moist air outside through a vent. They require an external exhaust and are generally simpler in design. Maintenance often involves keeping the vent clear to prevent overheating and ensuring efficient operation.
Condenser Dryers: Instead of venting hot air outside, these dryers condense the moisture from the air into a water tank or drain it away. They are ideal for spaces without external venting options. Their internal components, like heat exchangers, require occasional cleaning to maintain efficiency.
Heat Pump Dryers: The most energy-efficient type, heat pump dryers reuse hot air by sending it through an evaporator to remove moisture, then reheating it. They operate at lower temperatures, making them gentle on clothes, but can be more complex to repair due to their intricate systems.
Regardless of type, all clothes dryers rely on a motor to turn the drum, a heating element (or gas burner) to generate heat, and a control system to manage cycles. When the drum stops spinning, the issue typically lies with the mechanical components responsible for rotation or the electrical signals that power them.
Smart Choices: Selecting a Durable Clothes Dryer
While this guide focuses on repair, making an informed purchase can significantly reduce future troubleshooting needs. When choosing a clothes dryer, prioritizing durability and ease of maintenance can be a smart long-term strategy.
- Capacity: Select a dryer with a capacity that comfortably matches your washer’s load size. Overloading a dryer is a common cause of premature wear on belts, motors, and rollers, contributing to problems like a non-spinning drum.
- Key Features: Look for models with robust construction and accessible components. Some manufacturers design their appliances with common DIY repairs in mind, making parts like belts and rollers easier to replace. Features like moisture sensors can also extend the life of your dryer by preventing over-drying, which can strain components.
- Reputable Brands: Investing in brands known for reliability and customer support can be beneficial. These brands often use higher-quality components and provide extensive documentation, including troubleshooting guides and parts diagrams, which are invaluable for DIY repairs.
- Value for Money: Sometimes, a slightly higher upfront cost for a more durable model can save significant money and hassle in repair costs and appliance longevity. Consider the warranty and availability of spare parts.
By choosing wisely, you can often mitigate the likelihood of encountering issues such as a clothes dryer that won’t spin, ensuring a smoother laundry experience for years to come.
Troubleshooting Common Clothes Dryer Issues: When Your Drum Won’t Spin
When your clothes dryer’s drum refuses to spin, it’s time to put on your technician’s hat. Many issues are surprisingly simple to fix, but safety must always be your first priority.
Safety First: Essential Precautions
Before attempting any inspection or repair, always unplug your electric dryer from the wall outlet. For gas dryers, also turn off the gas supply valve in addition to unplugging the unit. This prevents electrical shock and potential gas leaks. Wear gloves to protect your hands from sharp edges inside the appliance.
Initial Checks (The Easy Fixes)
Start with the simplest potential problems, as they often have the quickest solutions.
-
Check the Power Supply:
- Is it Plugged In? It sounds basic, but ensure the dryer’s power cord is fully seated in the wall outlet. Sometimes, vibrations can cause it to loosen.
- Circuit Breaker or Fuse: Dryers draw a lot of power. Check your home’s electrical panel for a tripped circuit breaker (usually in the “off” or middle position) or a blown fuse. Reset the breaker by flipping it completely off, then back on.
- Control Lock: Many modern dryers have a “Control Lock” feature to prevent accidental use. If this is activated, the dryer won’t start or spin. Consult your owner’s manual for how to deactivate it.
- Dryer Settings: Some newer models include special settings like “Dry Flat” or “Rack Dry” for delicate items, where the drum deliberately does not spin. Ensure your dryer is set to a standard tumbling cycle.
-
Inspect the Door Switch:
- Your dryer won’t operate if the door isn’t completely closed and latched. The door switch is a safety mechanism that tells the dryer when the door is secure.
- Test It: Open the dryer door and manually press the door switch (a small button usually located near the door frame or latch mechanism). If the interior light goes off when pressed, the switch is likely functioning. If the light stays on, or if you hear no click, the switch might be faulty.
- Replacement: A faulty door switch can often be replaced by unscrewing a few panels and disconnecting wires. Ensure you get the correct part for your model.
-
Check for Overloading:
- A dryer packed too full with heavy wet laundry can put excessive strain on the motor and drive belt, preventing the drum from turning.
- Solution: Remove some items and try to spin the drum by hand. If it spins freely now, you’ve found the problem. Always adhere to the manufacturer’s recommended load capacity.
-
Test for a Seized Drum:
- Sometimes, an object like a small toy, sock, or coin can get lodged between the drum and the dryer housing, preventing it from rotating.
- Manual Spin: Reach into the dryer and try to rotate the drum by hand. It should turn with relative ease. If it’s completely stuck or very difficult to move, inspect for foreign objects that might be jamming it. You may need to remove the dryer’s top or back panel for a thorough inspection.
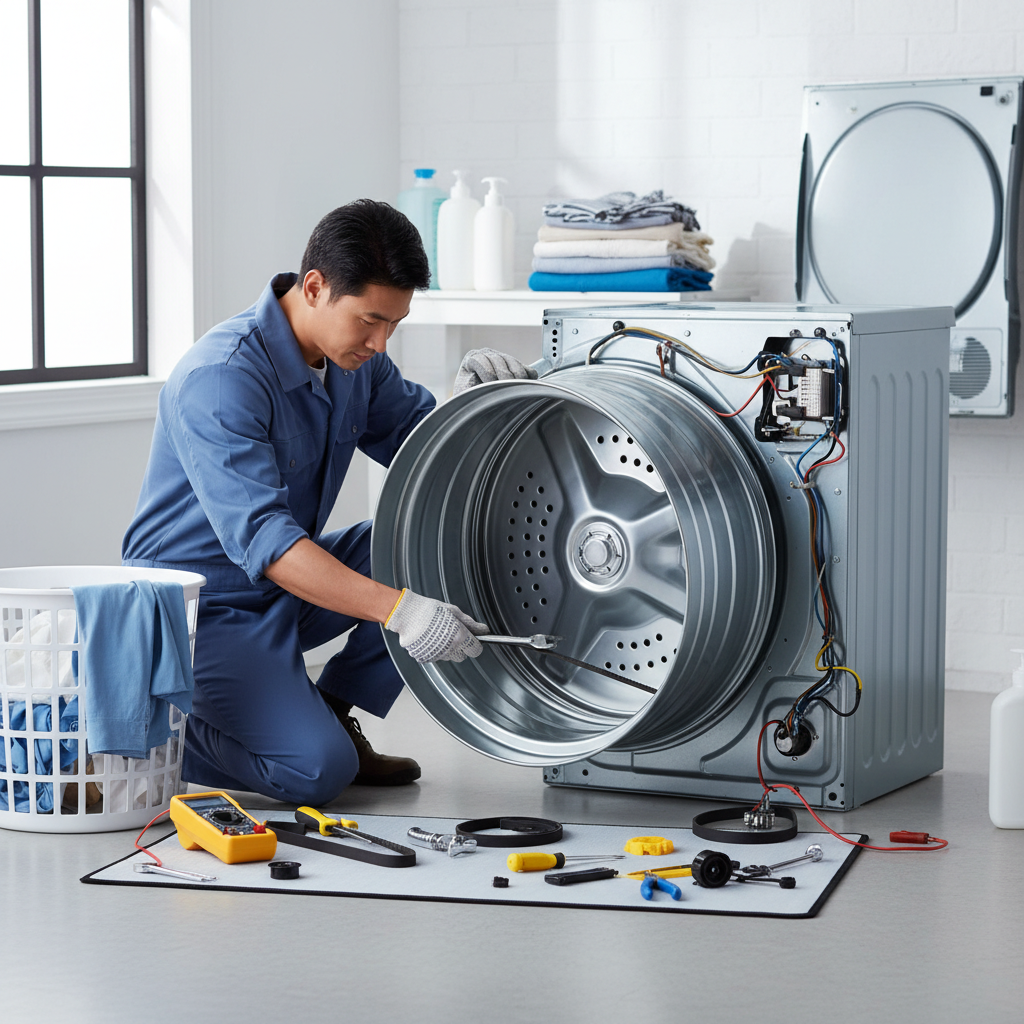
Deeper Dive (Component Inspection & Repair)
If the initial checks don’t resolve the issue, it’s time to delve into the dryer’s internal components. This often requires partially disassembling the dryer. Always refer to your dryer’s specific service manual or online resources for your model.
-
The Drive Belt:
- Function: The drive belt is a long, thin rubber belt that wraps around the dryer drum, the motor pulley, and an idler pulley, transferring power from the motor to the drum. It’s the most common reason for a dryer not spinning while the motor hums.
- Inspection: With the dryer unplugged and panels removed (usually the top and front, or just the back), check the drive belt. It might be broken, stretched, or slipped off its pulleys. If you can easily spin the drum by hand with very little resistance, the belt is almost certainly broken.
- Replacement: Replacing a drive belt is a common DIY repair. You’ll need to remove the old belt, position the new one around the drum, motor pulley, and idler pulley, ensuring proper tension. Specific routing varies by model, so consult a diagram for your dryer.
-
The Idler Pulley:
- Function: This pulley provides tension to the drive belt, ensuring it stays in contact with the drum and motor pulley.
- Inspection: Check the idler pulley for smooth operation and proper tension. If it’s seized, wobbly, or doesn’t provide adequate tension to the belt, it can prevent the drum from spinning.
- Replacement: Replacing a faulty idler pulley is typically straightforward, often involving removing a single bolt. Lubricating a stiff pulley might offer a temporary fix, but replacement is usually best for a lasting solution.
-
Drum Rollers (Support Rollers):
- Function: The drum rests on a set of rollers (usually two at the front and two at the back) that allow it to spin smoothly.
- Inspection: Worn-out drum rollers can cause the drum to seize, create loud squeaking or thumping noises, or prevent it from turning at all. With the dryer open and the belt removed, try turning the drum by hand. If it feels rough, stiff, or makes grinding noises, the rollers may be the culprit. Look for flat spots or excessive wear.
- Replacement: Replacing drum rollers usually involves removing the drum itself, which can be a more involved DIY task. It’s often recommended to replace all rollers simultaneously for even wear.
-
Drum Bearing:
- Function: The drum bearing supports the rear of the drum, allowing it to rotate.
- Inspection: Similar to drum rollers, a worn or seized drum bearing can prevent the drum from spinning or cause loud noises. If the drum feels extremely stiff or makes a scraping noise when rotated manually (after removing the belt), the bearing may be at fault.
- Replacement: This can be a complex repair, sometimes requiring specialized tools and significant disassembly.
-
Thermal Fuse:
- Function: This is a safety device designed to blow (trip) and cut power to the dryer if it overheats, preventing a fire.
- Inspection: If the thermal fuse has tripped, the dryer may stop spinning and potentially stop heating. You can test it for continuity with a multimeter. A blown fuse will show no continuity.
- Root Cause & Replacement: If the thermal fuse is blown, it must be replaced. However, it’s critical to identify why it blew. The most common cause is a clogged dryer vent, which restricts airflow and leads to overheating. Clean your dryer vent thoroughly from the dryer to the exterior of your home. Other causes include a faulty heating element or thermostat. Failing to address the underlying issue will lead to the new fuse blowing again.
-
The Motor:
- Function: The motor is the powerhouse that drives the drive belt, turning the drum.
- Inspection: If the motor makes a loud humming sound but the drum doesn’t spin, the motor might be trying to run but is stalled (perhaps due to a seized drum or broken component). If there’s no sound or a burnt smell, the motor itself could be faulty.
- When to Call a Pro: Motor replacement is generally a more advanced repair. If you suspect a motor issue and lack extensive mechanical and electrical experience, it’s best to consult a professional appliance technician.
When to Call a Professional
While many dryer repairs are within the scope of a confident DIYer, some issues are best left to the experts.
- Electrical Wiring Problems: Beyond checking breakers and plugs, complex electrical faults or wiring issues should be handled by a qualified electrician or appliance technician.
- Gas Leaks: If you have a gas dryer and suspect a gas leak (e.g., smell of gas), immediately turn off the gas supply and call a professional. Do not attempt to fix it yourself.
- Complex Component Failures: Issues with the main control board, internal wiring, or extensive motor problems can be intricate and dangerous to repair without proper training and tools.
- Age of Appliance: If your clothes dryer is nearing the end of its typical lifespan (around 10-13 years), and requires significant, costly repairs, it might be more economical to invest in a new, energy-efficient model rather than pouring money into an old one.
Extending Your Dryer’s Lifespan: Usage and Maintenance Tips
Preventative care is key to avoiding issues like a non-spinning drum and prolonging your clothes dryer’s life.
- Clean the Lint Filter After Every Load: This is arguably the most important maintenance step. A clogged lint filter restricts airflow, forcing your dryer to work harder, increasing energy consumption, and significantly raising the risk of overheating and fire hazards (which can trigger the thermal fuse).
- Regularly Clean the Dryer Vent: At least once or twice a year, thoroughly clean the entire dryer vent duct from the back of the dryer to the exterior exhaust hood. Lint buildup in the vent is a major cause of overheating and decreased drying efficiency.
- Avoid Overloading: Overloading puts undue stress on the drive belt, motor, and drum rollers, leading to premature wear and potential failure. Dryers are designed for optimal performance with specific load sizes.
- Inspect Components Periodically: If you’re comfortable, a quick visual inspection of the belt, rollers, and pulleys every few years (with the power off) can help catch minor issues before they become major problems.
- Level Your Dryer: An unbalanced dryer can vibrate excessively, putting stress on internal components and potentially causing parts to shift or wear unevenly. Ensure your dryer is level using adjustable feet.
Energy-Efficient Drying: Tips to Save Power
Efficient operation not only saves money but also contributes to the longevity of your clothes dryer by reducing strain and wear.
- Don’t Over-Dry: Use moisture-sensing features if your dryer has them, or pull clothes out as soon as they are dry. Over-drying wastes energy and can be harsh on fabrics.
- Dry Similar Fabrics Together: This allows for more uniform drying times and reduces the need for multiple cycles or extended drying.
- Clean Lint Filter: As mentioned, a clean lint filter is crucial for efficient airflow and faster drying times, directly translating to lower energy consumption.
- Maintain Your Dryer Vent: A clear vent allows air to flow freely, reducing drying time and energy use.
- Load Size: Dry full loads, but avoid overloading. A properly sized load ensures efficient air circulation and heat distribution.
- Spin Cycle in Washer: Ensure your washing machine’s spin cycle is effectively removing as much water as possible from clothes before they go into the dryer. The less water in the clothes, the less work the dryer has to do.
- Take Advantage of Sunlight: On sunny days, consider line-drying some items, especially heavier ones, to reduce dryer usage.
Where to Find Reliable Dryer Parts and Service
When a DIY repair requires replacement parts, or if the issue is beyond your comfort level, knowing where to turn is essential.
- Appliance Parts Retailers: Many online and local stores specialize in appliance parts. Be sure to have your dryer’s full model number (usually found on a sticker inside the door frame or on the back of the unit) to ensure you order the correct component.
- Manufacturer Websites: Most major appliance manufacturers offer parts directly through their websites or provide a list of authorized dealers.
- Local Appliance Repair Shops: These shops often stock common parts and can provide advice. If you decide not to DIY, they can also offer professional repair services.
- Online Marketplaces: Reputable online marketplaces can be a source for parts, but always verify the seller’s credibility and the part’s authenticity.
When in doubt about a repair or the source of a part, seeking professional advice or service is always the safest option.
Conclusion
A clothes dryer that won’t spin can be a major inconvenience, but with a systematic approach to troubleshooting, many common issues can be resolved right at home. From simple checks like power supply and door switches to more involved component replacements such as drive belts and drum rollers, understanding your appliance empowers you to tackle these problems effectively. Regular maintenance, including diligent lint filter and vent cleaning, is paramount not only for efficient operation but also for preventing these frustrating breakdowns and extending the overall life of your clothes dryer. By embracing these DIY repair and maintenance tips, you can ensure your laundry routine remains uninterrupted. What DIY repair success stories have you experienced with your appliances?
Frequently Asked Questions
Why is my clothes dryer humming but not spinning?
If your dryer motor hums but the drum doesn’t turn, it’s a strong indicator of a broken or dislodged drive belt. The motor is receiving power and trying to spin, but the connection to the drum is lost. Other possibilities include a seized drum or a faulty motor that cannot fully engage.
How much does it cost to fix a dryer belt yourself?
The cost to fix a dryer belt yourself is primarily the cost of the replacement belt, which typically ranges from $20 to $50, depending on your dryer model. This DIY approach avoids labor costs, which can significantly increase the total if you hire a professional.
Can I fix a dryer that won’t spin if the motor is dead?
While it is technically possible to replace a dead dryer motor yourself, it is one of the more complex and costly DIY repairs. Motor replacement usually requires extensive disassembly and electrical work. For most homeowners, professional repair or considering a new appliance may be more practical if the motor is confirmed to be dead.
What tools do I need for common dryer repairs?
For most common DIY dryer repairs, you’ll typically need basic hand tools such as screwdrivers (Phillips and flathead), nut drivers, pliers, and possibly a multimeter for testing electrical components like thermal fuses. Your dryer’s manual may also specify particular tools for disassembly.
How often should I clean my dryer vent to prevent spinning issues?
You should clean your dryer’s lint filter after every load. The main dryer vent duct, from the back of the machine to the outside, should be thoroughly cleaned at least once a year, or more frequently if you notice longer drying times or excessive lint buildup. This prevents overheating and protects components like the thermal fuse.